
In the previous part, we talked about two very important OSG concepts: nodes and drawables. Now, we’ll deal with a third very important concept: state sets. These form what I consider the triad of the very fundamental OSG concepts.
The class representing a state set in OSG is, not surprisingly, osg::StateSet,
and it is so important that this whole post is dedicated to it (and to its
related classes). But, in order to understand the importance of
osg::StateSets, one must have some basic understanding on how does OpenGL
work. This OpenGL background is briefly discussed in the next section. If you
think you have already read enough things titled “OpenGL as a state machine”
feel free to skip to “OSG and the OpenGL state”. Otherwise, keep reading.
OpenGL as a state machine
OpenGL can be roughly seen as something that transforms vertices into pixels. Essentially, the programmer says: “Hey, OpenGL, please process this list of points in 3D space for me.” And, shortly after, OpenGL answers: “Done! The results are on your 2D screen, in the form of pixels” This is not a 100% accurate or complete description of OpenGL, but for the purposes of this chapter it is good enough.
So, OpenGL takes vertices and makes pixels. Suppose we pass four vertices to OpenGL. Let’s call them v1, v2, v3 and v4. Which pixels should they yield? Or, rephrasing the question: how should they be rendered? Well, to begin with, what do these vertices represent? Four “isolated” points? A quadrilateral? Two line segments (v1–v2 and v3–v4)? Perhaps three line segments (v1–v2, v2–v3 and v3–v4)? And why not something else?
Going in other direction, what color should the pixels be? Are the rendered things affected by any light source? If they are, how many light sources are there, where they are and what are their characteristics?
We could keep asking questions like these for ages (or pages, at least), but let’s stop here. The important thing to notice is that, although OpenGL is essentially transforming vertices into pixels, there are lots of different ways to perform this transformation. And, somehow, we must be able to “configure” OpenGL so that it does what we want. But how to configure this plethora of settings?
Divide and conquer. There are tons of settings, but they are orthogonal. This means that we can change, for example, lighting without touching color. Of course there are interactions among the settings, in the sense that the final color of a pixel depends both on the lighting and color configuration (and others). However, the important idea is that they can be set independently. (As an aside, would you believe that I wrote this note just to ask if you noticed that this is the third paragraph in sequence ending with a question?)
From now on, let’s call these OpenGL settings by their more proper names: attributes and modes (the difference between an attribute and a mode is not important right now). So, OpenGL has a set of attributes and modes, and this set of attributes and modes define precisely how OpenGL behaves. I suppose the designers of OpenGL, when documenting it, soon noticed that writing a long expression like “set of attributes and modes” is very tiresome, and hence they gave it a shorter name: “state”.
And this explains the title of this section. OpenGL can be seen as a state machine. All the important details that define exactly how vertices are transformed into pixels are part of the OpenGL state. If we were drawing green things and now want to draw blue things, we have to change the OpenGL state. If we were drawing things with lighting enabled and now want to draw things with lighting disabled, we have to change the OpenGL state. The same goes for blending (used for translucency) and everything else.
The obvious question is “how do we change the OpenGL state when using OSG?” This is answered in the rest of this post.
OSG and the OpenGL state
In OSG, the class used to deal with the OpenGL state is osg::StateSet. It is
important to emphasize that an osg::StateSet doesn’t represent the whole
OpenGL state, but instead just a subset of it. The best way to think about an
instance of osg::StateSet is as the subset of the OpenGL that we are
particularly interested in using for rendering a specific part of the scene.
Suppose that you want to render part of your scene translucently. In a
high-level view, what you have to do is create an osg::StateSet that specifies
just the part of the OpenGL state dealing with translucency and tell OSG to use
this osg::StateSet when rendering the specific parts of the scene you want
translucent.
Now, let’s start looking at the details. First, what exactly do we have in an
osg::StateSet? I said before that the OpenGL state is composed of attributes
and modes, so it should come without surprise that the most important things
inside an osg::StateSet are exactly those: attributes and modes. The time to
know exactly what attributes and modes are has come.
Modes are simply rendering features that can be turned on and off. Attributes are more complex settings, that can be configured in more detail. While tempting, it would be a bit misleading to think of modes just as Boolean attributes. I say so because, in OpenGL, it is common to have a “macro feature” that can be enabled or disabled as whole with a mode, but that can be “fine tuned” with an attribute. Thus, in practice, we usually have a pair of mode and attribute that are used together. OpenGL fog, for instance, has a mode that can be used to enable or completely disable it, but it also has an attribute that allow to define the fog color and thickness.
If you have ever programmed directly in OpenGL, modes are the things we turn on
or off by calling glEnable() and glDisable(), while attributes are those
settings with dedicated calls, like glLight(), glMaterial() and glFog().
The final detail we have to deal with before trying an example is understanding
how do state sets relate to scene graphs. The answer is simple enough: state
sets can be attached both to nodes and drawables. Figure 2.1 shows an example of
our good and old “road and truck” scene graph with a couple of osg::StateSets
added to it. Notice that the figure shows osg::StateSets linked both to a node
and to a drawable — very illustrative, but I’d try to be more consistent in a
real application.
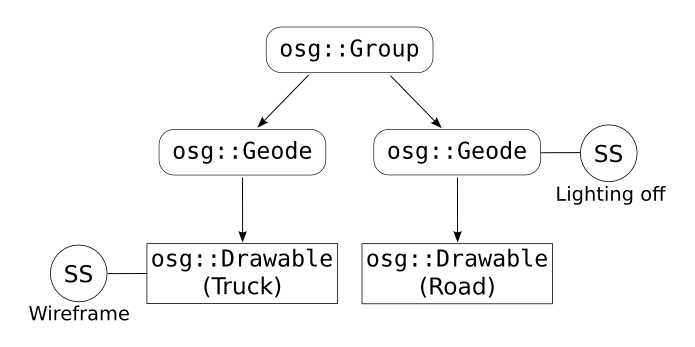
Figure 2.1: A scene graph for a scene consisting of a road and a truck, with StateSets (circles with “SS” inside them) changing the way they are rendered. The truck will be rendered in wireframe; the road, with lighting off.
A 3D viewer with states
As promised, here comes an example of the manipulation of the OpenGL state in
OSG. It is a variation of the 3D viewer shown in the previous
post: in addition to loading a node
from a file and displaying it, this one attaches an osg::StateSet with some
attributes and modes changes, so that the node is rendered differently.
// ViewerWithStates.cpp

#include <iostream>
#include <osg/Fog>
#include <osg/PolygonMode>
#include <osgDB/ReadFile>
#include <osgViewer/Viewer>

int main(int argc, char* argv[])
{
   // Check command-line parameters
   if (argc != 2)
   {
      std::cerr << "Usage: " << argv[0] << " <model file>\n";
      exit(1);
   }

   // Load the model
   osg::ref_ptr<osg::Node> loadedModel = osgDB::readNodeFile(argv[1]);

   if (!loadedModel)
   {
      std::cerr << "Problem opening '" << argv[1] << "'\n";
      exit(1);
   }

   // Play with the StateSet
   const osg::Vec4 fogColor(0.5, 0.5, 0.5, 1.0);

   osg::ref_ptr<osg::StateSet> ss = loadedModel->getOrCreateStateSet(); // (1)

   ss->setMode(GL_LIGHTING, osg::StateAttribute::OFF); // (2)

   osg::ref_ptr<osg::PolygonMode> polyMode(new osg::PolygonMode()); // (3)
   polyMode->setMode(osg::PolygonMode::FRONT_AND_BACK,              // (3)
                     osg::PolygonMode::LINE);                       // (3)
   ss->setAttribute(polyMode);                                      // (3)

   osg::ref_ptr<osg::Fog> fog(new osg::Fog()); // (4)
   fog->setMode(osg::Fog::LINEAR);             // (4)
   fog->setColor(fogColor);                    // (4)
   fog->setStart(15.0);                        // (4)
   fog->setEnd(100.0);                         // (4)
   ss->setAttributeAndModes(fog);              // (4)

   // Create a viewer, use it to view the model
   osgViewer::Viewer viewer;
   viewer.setSceneData(loadedModel);
   viewer.getCamera()->setClearColor(fogColor); // (5)

   // Enter rendering loop
   viewer.run();
}
This example starts to become really interesting at the point marked with (1).
There is where we put out hands in an osg::StateSet for the first time. The
method getOrCreateStateSet() (which exists both for osg::Nodes and
osg::Drawables) is very handy: if the node or drawable already has an
StateSet attached to it, it is returned. If not, a new one is created and
returned. In my personal experience, this is much more common than instantiating
an osg::StateSet manually.
We then begin to play with the state. At point (2), we say that our
osg::StateSet ss shall disable the GL_LIGHTING mode. All OpenGL modes can be
used with setMode(). If you are nor familiar with OpenGL, disabling lighting
does not mean that everything will be in the dark. It just tells OpenGL to
bypass its lighting computation, which would produce shaded objects (with
polygons directly facing a light source appearing brighter). With lighting
disabled the color of the polygons will be used just as set on the 3D model (or
as set programmatically, if it was the case), without any manipulation that
could result in a more realistic-looking scene.
Next, in the lines marked with (3), we change an attribute. Attributes in OSG
are represented by subclasses of osg::StateAttribute. In this case, we are
dealing with an attribute named osg::PolygonMode (yes, despite the “Mode” in
the name, it is an attribute), which let us specify how to render polygons: by
default they are drawn filled; this let us make them be drawn as lines (just its
edges are drawn) or points (just its vertices are drawn). This is one of the
rare cases of attribute without an associated mode – which makes sense, since
polygons have to be rendered somehow.
The details behind osg::PolygonMode are beyond the scope of this guide, but I
must at least say that it provides a very straightforward equivalent to the
glPolygonMode() call from OpenGL. This is common: subclasses of
osg::StateAttribute usually encapsulate a single (or a few) of the OpenGL
state-configuring functions.
For the purposes of this text, the most important thing to keep in mind are the
steps necessary to set an attribute. First, instantiate the desired
osg::StateAttribute subclass (here, osg::PolygonMode). Then, call its
methods to configure it as it pleases you. (Alternatively, most attribute
classes have optional parameters to their constructors that allow to set them up
right upon construction.) And finally, call the setAttribute() method of
osg::StateSet to add the attribute to the state set. In the example, we made
both front- and back-facing polygons to be rendered as lines, resulting in a
wireframe rendering.
Our third and last addition to ss is one of the common cases in which both an
attribute and a mode are set at the same time (4). Specifically, we are
configuring and enabling OpenGL’s fog. As in the polygon mode case, we start
instantiating a class derived from osg::StateAttribute (which in this case is
osg::Fog) and calling some of its methods to configure it as we desire. The
difference is that we used setAttributeAndModes() (instead of
setAttribute()). This function, with a single call, adds to the state set the
attribute passed as parameter, and the mode associated with it. It has an
optional second parameter which is the desired value for the mode. By default,
this is ON, which is what we normally want. So, setAttributeAndModes() is
just a shortcut. We could have used the following code instead:
ss->setAttribute(fog);
ss->setMode(GL_FOG, osg::StateAttribute::ON);
Listing and describing all the OpenGL modes and attributes is well out of the scope of this text. For details, please check your favorite OpenGL reference and the OpenSceneGraph documentation.
One final note about this example: the call to osg::Camera::setClearColor()
(5) defines which color to use as the scene background. If you are not familiar
with OpenGL, try commenting this line out and running the program. (Comment out
the lines setting the wireframe mode for even better results.) Does the
resulting rendering look strange for you? Try to discover why the scene is
rendered that way. This is an important aspect about how OpenGL (and OSG) works.
(No, I’ll not give the answer here.)
State inheritance
The last example was interesting and has shown how to do some fundamental OSG operations, but you may be wondering… that example has a scene graph with a single node, right? And scene graphs in real life are more complex than that. So, what happens when we have multiple nodes?
The truth is (…drum roll…) the previous example already dealt with multiple
nodes. Really. Recall that the node returned by osgDB::readNodeFile() may be
(and oftentimes is) a group with an arbitrarily complex sub-scene graph below
it. Let’s think a bit more deeply about how our “viewer with states” works. We
set the state just in the node returned by osgDB::readNodeFile(), but the
effects of this altered state are seen in the whole scene, even in the
occasional nodes below loadedModel. The conclusion is that the OpenGL state is
inherited by child nodes. Change the state in a parent node, and all its
descendants are affected, too.
What remains to be explained is what happens when multiple osg::StateSets
affect a single node. This happens when there are osg::StateSets attached to
more than one node in the path from the node itself to the root of the scene
graph. Let’s try this in another example. Once again, it will be a 3D viewer,
but now it will show the same 3D object multiple times, with different
osg::StateSets affecting them. The scene graph for it is shown in Figure 2.2.

Figure 2.2: The scene graph for the “Multiplopia Viewer” example. Again, osg::PositionAttitudeTransform has been shortened to osg::PAT.
And the source code for our “Multiplopia Viewer” follows.
// MultiplopiaViewer.cpp

#include <cstring>
#include <iostream>
#include <osg/Group>
#include <osg/PolygonStipple>
#include <osg/PolygonMode>
#include <osg/PositionAttitudeTransform>
#include <osgDB/ReadFile>
#include <osgViewer/Viewer>

osg::ref_ptr<osg::PositionAttitudeTransform>
CreateSubGraph(osg::ref_ptr<osg::Group> root,
               osg::ref_ptr<osg::Node> model,
               double translation)
{
   osg::ref_ptr<osg::PositionAttitudeTransform> pat(
      new osg::PositionAttitudeTransform());

   root->addChild(pat);
   pat->addChild(model);
   pat->setPosition(osg::Vec3(translation, 0.0, 0.0));

   return pat;
}

int main(int argc, char* argv[])
{
   // Check command-line parameters
   if (argc != 2)
   {
      std::cerr << "Usage: " << argv[0] << " <model file>\n";
      exit(1);
   }

   // Load the model
   osg::ref_ptr<osg::Node> loadedModel = osgDB::readNodeFile(argv[1]);

   if (!loadedModel)
   {
      std::cerr << "Problem opening '" << argv[1] << "'\n";
      exit(1);
   }

   // Create the scene graph
   const double translation = 2.2 * loadedModel->getBound().radius(); // (1)

   osg::ref_ptr<osg::Group> root (new osg::Group());

   osg::ref_ptr<osg::PositionAttitudeTransform> child1 =
      CreateSubGraph(root, loadedModel, 0.0);
   osg::ref_ptr<osg::PositionAttitudeTransform> child2 =
      CreateSubGraph(root, loadedModel, translation);
   osg::ref_ptr<osg::PositionAttitudeTransform> child3 =
      CreateSubGraph(root, loadedModel, 2 * translation);
   osg::ref_ptr<osg::PositionAttitudeTransform> child4 =
      CreateSubGraph(root, loadedModel, 3 * translation);

   // Play with the StateSets
   osg::ref_ptr<osg::StateSet> rootSS = root->getOrCreateStateSet();
   rootSS->setMode(GL_LIGHTING, osg::StateAttribute::OFF); // (2)

   osg::ref_ptr<osg::StateSet> sharedSS = child2->getOrCreateStateSet(); // (3)
   sharedSS->setMode(GL_LIGHTING, osg::StateAttribute::ON);              // (3)
   child4->setStateSet(sharedSS);                                        // (3)

   osg::ref_ptr<osg::StateSet> thirdSS = child3->getOrCreateStateSet();
   osg::ref_ptr<osg::PolygonStipple> stipple (new osg::PolygonStipple());
   GLubyte mask[128];
   std::memset(mask, 0x55, 128);
   stipple->setMask(mask);
   thirdSS->setAttributeAndModes(stipple);

   // Create a viewer, use it to view the model
   osgViewer::Viewer viewer;
   viewer.setSceneData(root);

   // Enter rendering loop
   viewer.run();
}
Looking only at the code, there is nothing of much interest in this last
example. It shows how to get the bounding sphere of a node (call to
getBound(), in the line marked with (1)), which is used to position the four
copies of the model without touching themselves. It also uses a different
osg::StateAttribute (osg::PolygonStipple) which, frankly, is not very useful
nowadays.1
The really interesting part of this example is conceptual. Essentially, our scene graph has one root node with four very similar sub-graphs below it, all of them displaying the object passed in the command-line. In the root node, we disable the lighting (2), as we did before. As discussed above, the child nodes will inherit this state, that is, all the four models will have lighting disabled.
The first of the child sub-graphs does not further change the rendering state. Hence, the first copy of the model is simply rendered without lighting. The second and fourth children are more interesting. For these, we enabled lighting (3), overriding the setting made at the parent node (notice that the second and fourth children are rendered with lighting enabled).
As a side note, on the lines marked with (4), see that the second and fourth
children share the same osg::StateSet: we getOrCreateStateSet() for the
second child, and assign the returned osg::StateSet directly to the fourth
child (using setStateSet()). Sharing state sets as much as possible is a good
practice. While rendering, OSG can draw all objects sharing the same state in
sequence, reducing the number of changes in the rendering state. This is good
for performance, because each change to the rendering state tends to slow down
the rendering.
So, to summarize what is interesting about the second and fourth children:
first, when child nodes change the state in a way that “contradicts” the state
of its parents, the wishes of the child node prevails; and second, sharing
osg::StateSets is possible (and even encouraged).
For the third sub-graph, we enable the polygon stippling mode (and set its related attribute) that was not mentioned in the parent’s state. As a result the third node is rendered both with lighting disabled (inherited from the parent) and with stippling. This is a powerful feature. We can design our scene graph in a way that we can set common state in parent nodes, and add more details to the state of the children when we need to “fine tune” their look.
Totalitarian nodes — and the resistance
As we saw in the previous example program, nodes usually respect the individual
rights: they may “recommend” a state to its children nodes, but the children are
free to be different. It turns out that we can create “totalitarian nodes”,
which enforce their children to follow their “policies”. This is done by using
OVERRIDE when setting a mode. For instance, try replacing line marked with (2)
of the example with this one:
rootSS->setMode(
   GL_LIGHTING,
   osg::StateAttribute::OFF | osg::StateAttribute::OVERRIDE);
This says that the disablement of lighting in the root node must override any attempts to enable it in the children. As a result, all nodes are rendered without lighting, even those that tried to re-enable it.
But, just like in real life, totalitarianism can be resisted, and the guerrilla
of OSG is “PROTECTED”. When a node has a mode set with PROTECTED, it will
ignore the parent’s OVERRIDE. So, if you further modify the example, replacing
the second line of section (3) with
sharedSS->setMode(
   GL_LIGHTING,
   osg::StateAttribute::ON | osg::StateAttribute::PROTECTED);
then, the second and fourth children will be rendered shaded (with lighting enabled) again.
It is also possible to set a mode as osg::StateAttribute::INHERIT, which
simply requests the node to inherit the mode’s value from the parent nodes. Yes,
this is the default behavior; you may want to use it to remove a mode previously
set in an osg::StateSet.
Note that OVERRIDE, PROTECTED and INHERIT are set per mode. That is, if
you OVERRIDE a given mode, only this mode is overridden.
I consider that these three options could be tagged as advanced. I don’t remember to ever have used them in real applications, though maybe this has more to do with the kind of applications I developed than with the usefulness of the feature. Anyway, I think they don’t deserve an example program.
Ready for more OSG? Part 3 is here.
-
Polygon stipple used to be more popular in the past, to implement a quick and dirty translucency effect. Today, even cheap hardware can do alpha blending efficiently, and that provides a much nicer translucency effect; translucency will be covered in a future post. ↩︎