
I could made this part fit into a single paragraph. Serious, just watch:
Light, textures and shaders are part of the rendering state, so they are handled
just as shown in the previous post.
Sure, using them requires the use of subclasses of osg::StateAttribute that
have not been shown, like osg::Light, osg::Texture2D, and osg::Program,
but the idea is the same. So, just spend some time with the Open Scene Graph
reference documentation and you are done.
And that’s it. All you need to know about lights, textures, and shaders in one paragraph. Well, not really. Lights, textures and shaders have their own quirks, complications and differences, so that, in practice, just spending some time with the reference documentation would not suffice to understand them. Thus, we need this post.
Lights: Positional State
The only reason why lights are not exactly like the rest of the rendering state
is that, unlike almost everything else, they have a positional nature: depending
on where your light bulbs, candles, torches or bonfires are located, the scene
will be rendered differently. Now, think about it: position is the key
difference, and OSG already has very good support to represent positions in the
scene (through hierarchies of transform nodes, like the
osg::PositionAttitudeTransform we have been using). Thus, wouldn’t it make a
lot of sense to use transform nodes to set the position of light sources? Yes,
it would — and that’s indeed how things work in OSG. However, given the way
that OpenGL handles lights, we ended up with something that is a bit
unintuitive.
Let’s begin with the things that are just like the regular rendering state we
have seen before. There is one rendering mode (GL_LIGHTING, which we have used
in a previous example program) that can be used to completely disable lighting.
When lighting is enabled, individual light sources can be independently enabled
or disabled using modes named GL_LIGHT0, GL_LIGHT1, and so on.1
So, there is nothing special on how we enable or disable individual lights on a
scene graph or subset of it. The two open questions are how to set the light
parameters (like color and direction) and how to position them in the scene.
Here is where things start to be different. The answers to both questions are
related to a node class, osg::LightSource, which plays a few different roles.
First, a osg::LightSource has linked to it an instance of an osg::Light,
which is the osg::StateAtrribute controlling the attributes of a light source.
Playing with the osg::Light methods, you can set the light color, or configure
it as, say, a point light that emits light to all directions or as a spot light.
The osg::Light has another fundamental information, which is the light number.
Light number n will only illuminate parts of the scene graph that have the
GL_LIGHTn mode enabled.
Second, the position of the osg::LightSource on the scene (given by the
transforms that appear between the root of scene graph and the
osg::LightSource itself) determines the position of the light source in the
world. Well, almost: the osg::Light also contains a position attribute, but
the position set there is relative to the position of the osg::LightSource. I
usually set the position of the osg::Light to (0, 0, 0) so that only the
osg::LightSource position is taken into account.
So, in summary: when you want a light in your scene, you add a
osg::LightSource to the scene graph, in a way that it is properly translated
to the position you want the light source to be in. Then, you configure the
light parameters on the osg::Light that comes for free with your
osg::LightSource; in particular, remember to set the light number. This will
illuminate all the parts of scene graph that have the corresponding
GL_LIGHTn mode enabled. Finally, don’t forget that disabling the
GL_LIGHTING mode, the whole lighting computation is bypassed.
What is so unintuitive about this? It is the fact that, if we think about it,
the osg::LightSource is not really emitting light. It merely sets the position
and attributes of a light source. If you want parts of the scene being
illuminated by this light, you still must to enable the corresponding
GL_LIGHT*n* mode in the desired subgraphs. (Yes, if you want to enable a light
to the whole scene you can just enable the mode in the graph root — the state
will be inherited normally).
I have one final practical tip to give here. If you look at the OSG reference
documentation, you’ll notice that an osg::LightSource is an osg::Group. Can
you guess why this is useful? (If you said “because all its children will be
lit”, go to the blackboard and copy the previous paragraph 100 times!) This is
useful because you may want to render some geometry (like a light bulb) to
represent your light source in the 3D world — and that is the place to add it.
After this lengthy, boring discussion, it’s time for an example. This one, will load a 3D model passed on the command-line, light it with a yellow light source, and also show a 3D object to indicate the position of this light source. Figure 3.1 shows the scene graph for the example.
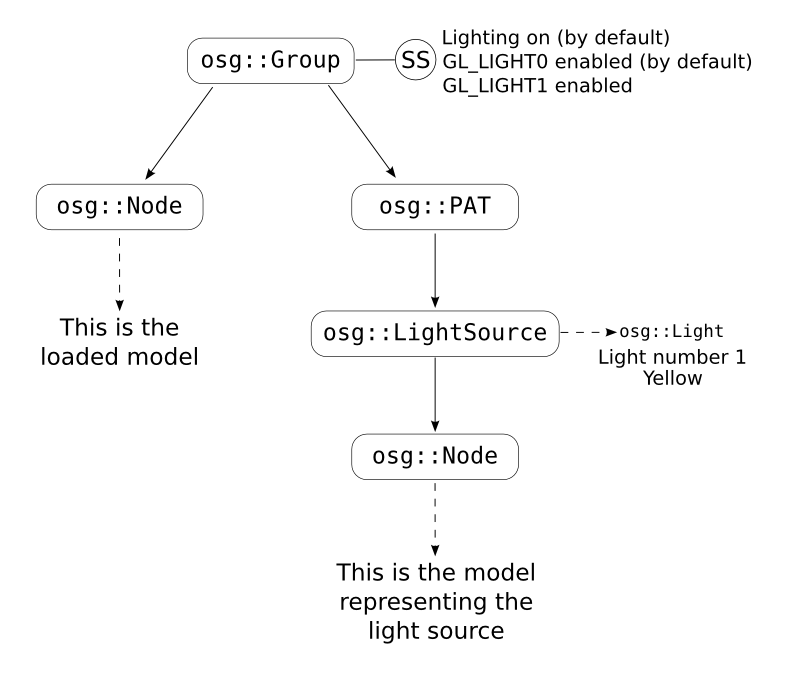
Figure 3.1: The scene graph for the Lightened Viewer.
// LightenedViewer.cpp

#include <iostream>
#include <osg/Light>
#include <osg/LightSource>
#include <osg/PositionAttitudeTransform>
#include <osgDB/ReadFile>
#include <osgViewer/Viewer>

int main(int argc, char* argv[])
{
   // Check command-line parameters
   if (argc != 2)
   {
      std::cerr << "Usage: " << argv[0] << " <model file>\n";
      exit(1);
   }

   // Load the model, create the bulk of the scene graph
   osg::ref_ptr<osg::Group> sgRoot(new osg::Group());

   osg::ref_ptr<osg::Node> loadedModel = osgDB::readNodeFile(argv[1]);
   if (!loadedModel)
   {
      std::cerr << "Problem opening '" << argv[1] << "'\n";
      exit(1);
   }

   sgRoot->addChild(loadedModel);

   osg::ref_ptr<osg::Node> lampModel = osgDB::readNodeFile("round_lamp.obj");
   if (!lampModel)
   {
      std::cerr << "Problem opening the lamp model.\n";
      exit(1);
   }

   osg::ref_ptr<osg::PositionAttitudeTransform> lightPAT(
      new osg::PositionAttitudeTransform());

   lightPAT->setPosition(osg::Vec3(5.0, 12.0, 3.0));
   sgRoot->addChild(lightPAT);

   // Setup GL_LIGHT1. Leave GL_LIGHT0 as it is by default (enabled)
   osg::ref_ptr<osg::LightSource> lightSource(new osg::LightSource());  // (1)
   lightSource->addChild(lampModel);                                    // (1)
   lightSource->getLight()->setLightNum(1);                             // (1)
   lightSource->getLight()->setPosition(osg::Vec4(0.0, 0.0, 0.0, 1.0)); // (1)
   lightSource->getLight()->setDiffuse(osg::Vec4(1.0, 1.0, 0.0, 1.0));  // (1)

   lightPAT->addChild(lightSource);

   osg::ref_ptr<osg::StateSet> ss = sgRoot->getOrCreateStateSet();
   ss->setMode(GL_LIGHT1, osg::StateAttribute::ON); // (2)

   // Create a viewer, use it to view the model
   osgViewer::Viewer viewer;
   viewer.setSceneData(sgRoot);

   // Enter rendering loop
   viewer.run();
}
The most interesting part of the code is marked with (1). This is where we
instantiate osg::LightSource and use its getLight() method to access the
osg::Light associated to it. We then set the light number to 1, its position
to zero (recall that this means “zero from the position of the
osg::LightSource”) and its diffuse color to yellow. The line marked with (2)
is also somewhat interesting: this is the point where we enable the light number
1 (GL_LIGHT1) in the whole scene graph.
Did you ever wonder why the examples so far were lit, even though we didn’t
configure any lights? That’s because osgViewer::Viewer, by default, configures
and enables a light source (GL_LIGHT0) for us. In the code, I used GL_LIGHT1
because I wanted to keep the “default OSG light” shedding light into the scene
normally. If I had used light zero, my light setup would override OSG default
light, resulting in a scene illuminated only by the yellow light. (Try it!)
Notice that the core OSG classes will let you work only with the traditional
OpenGL lighting model, which simplifies the real world lighting in many ways
I’ll not discuss here. OSG supports much fancier light-related effects (like
shadows, via the osgShadow nodekit — which is, again, beyond the scope of
this guide).
Just to close this section: lights are the most common case of positional state
in OSG, but they are not the only one. Clip planes are another not-so-rare case
(in OSG, they are handled by two classes, osg::ClipNode and osg::ClipPlane,
which correspond, respectively, to osg::LightSource and osg::Light).
Texturing for DIYers
Before making any other statement about texturing, I must make it clear that,
when loading a textured model with osgDB::readNodeFromFile(), everything is
handled automatically. Our previous examples, even the simplest ones, were
already capable of opening and displaying 3D models with textures. What we’ll
see here is for cases in which you need to handle things in a lower level.
Texturing is all about using texture coordinates to look up for color data somewhere. Typically, this “somewhere” is a 2D image, but there are alternatives, like 1D textures, 3D textures and cube maps (all of them are supported by OSG, by the way). So, texturing actually involves two problems. First, we need a way to define the texture coordinates for each vertex on our objects; and second, we must bind texture data (like an image) to them.
I’ll not get into details concerning the first problem, but here are some quick
tips. As I said before, if you are loading 3D models from files and they already
have texture coordinates, these will be loaded by osgDB::readNodeFromFile().
For cases in which you need to create your geometry programmatically, you’ll
very likely end up using the class osg::Geometry. This is a subclass of
osg::Drawable which allows you to create geometry from arrays of vertices,
colors, normals and, what is important in this context, texture coordinates.
Just look for osg::Geometry::setTexCoordArray().
Now we can talk about the second problem: binding texture data to an object.
Apart from a little detail I’ll talk about soon, this is done as we did in the
previous chapter: by altering the osg::StateSet of the parts of the scene
graph we want to affect. For texturing, the osg::StateAttributes we are
interested in are the ones which are subclasses of osg::Texture.
The little detail I mentioned in the previous paragraph is multitexturing (the
ability to bind multiple textures to a single object). Modern hardware (and,
actually, even not so modern hardware) has multiple texture units, so that
multitexturing can be handled very efficiently. But this brings the following
question: when we set a texture attribute in an osg::StateSet, to which
texture unit will the texture data bound?
That’s why we are better not use the regular calls like
osg::StateSet::setAttributeAndModes() to enable texture attributes. Instead,
we should use osg::StateSet::setTextureAttributeAndModes(), which requires an
additional parameter: an integer telling which texture unit to use. Using our
old friend osg::StateSet::setAttributeAndModes() for texturing doesn’t fail
completely: OSG uses the first texture unit (unit zero), and issues a warning
telling that you are doing something inelegant and that wonderful things would
happen to your life had you used osg::StateSet::setTextureAttributeAndModes()
as I told you to do. Or something like this.
Time for an example. And if you think I’ll be repetitive and create yet another 3D viewer… well, you are right. This time, our viewer will apply an image as texture in the displayed object. The scene graph for this example is pretty boring, but I heard that figures help to keep readers awake, so it is shown in Figure 3.2
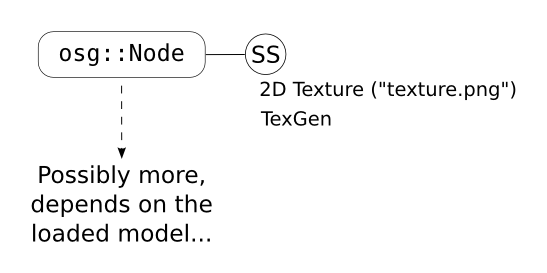
Figure 3.2: The boring scene graph for the Texturing Viewer.
// TexturingViewer.cpp

#include <iostream>
#include <osg/Texture2D>
#include <osg/TexGen>
#include <osgDB/ReadFile>
#include <osgViewer/Viewer>


int main(int argc, char* argv[])
{
   // Check command-line parameters
   if (argc != 2)
   {
      std::cerr << "Usage: " << argv[0] << " <model file>\n";
      exit(1);
   }

   // Load the model
   osg::ref_ptr<osg::Node> loadedModel = osgDB::readNodeFile(argv[1]);

   if (!loadedModel)
   {
      std::cerr << "Problem opening '" << argv[1] << "'\n";
      exit(1);
   }

   // Do the texturing stuff
   osg::ref_ptr<osg::StateSet> ss = loadedModel->getOrCreateStateSet();

   osg::ref_ptr<osg::Image> image = osgDB::readImageFile("texture.png"); // (1)
   osg::ref_ptr<osg::Texture2D> tex(new osg::Texture2D());               // (1)
   tex->setImage(image);                                                 // (1)
   ss->setTextureAttributeAndModes(0, tex);                              // (1)

   osg::ref_ptr<osg::TexGen> texGen(new osg::TexGen());                // (2)
   texGen->setPlane(osg::TexGen::S, osg::Plane(0.075, 0.0, 0.0, 0.5)); // (2)
   texGen->setPlane(osg::TexGen::T, osg::Plane(0.0, 0.035, 0.0, 0.3)); // (2)
   ss->setTextureAttributeAndModes(0, texGen);                         // (2)

   // Create a viewer, use it to view the model
   osgViewer::Viewer viewer;
   viewer.setSceneData(loadedModel);

   // Enter rendering loop
   viewer.run();
}
The most important part of this example is marked with (1). It shows how to use
osg::Texture2D to bind a 2D image to a an object (via its osg::StateSet).
Notice how we use setTextureAttributeAndModes() instead of
setAttributeAndModes() (in this particular case, we are using the first texure
unit — that’s what the zero passed as the first parameter means). There a few
other somewhat interesting things in these lines (how to load an image from a
file, for example), but I think they don’t need further explanations.
The section marked with (2) also deserve some words. There, we are using
osg::TexGen to automatically generate texture coordinates for our object. As I
said before, in practice (at least from my particular experience), we usually
read the texture coordinates directly from the 3D model files, or we set them
explicitly in an osg::Geometry. Here, however, I wanted the example to work
even with 3D models that don’t provide texture coordinates, so I went with
osg::TexGen. I will not give details on how it works; I’ll merely say that it
is yet another subclass of osg::StateAttribute — one that encapsulates the
glTexGen() OpenGL call. And, again, notice that we used
osg::StateSet::setTextureAttributeAndModes() passing the same texture unit as
before (namely, texture unit zero).
You may want to try using this viewer to open a 3D model that is already textured. What happens? Can you explain why? Then, for a taste of multitexturing, try changing the example program to use other texture units (for example, “1” instead of “0”) and open the textured model again. What happens now? Why? Spending some time wondering about these questions and doing some experiments will definitely, undoubtedly, positively improve your understanding of texturing in OpenGL and OSG. Or so I think.
Shaders for OSGers
As a layer on top of OpenGL, OSG supports shaders written in GLSL (the OpenGL Shader Language). OSG hides most of the bureaucracy that is needed to use shaders with OpenGL, but the main concepts behind GLSL (programs, shaders, uniform variables, and the GLSL language itself) are still necessary to make proper use of this increasingly important feature. These topics are far beyond the scope of this text (I warmly recommend the OpenGL Shading Language, AKA the Orange Book, as a guide and reference about them; Lighthouse 3D also has a pretty nice GLSL Tutorial).
Mirroring the OpenGL/GLSL specification, OSG has two classes for handling
shaders: osg::Program and osg::Shader. Additionally, a third class,
osg::Uniform represents uniform variables. osg::Program is the one derived
from osg::StateAtrribute. As in “pure” OpenGL/GLSL, one or more shaders must
be attached to a program so that it can do something useful. Uniforms, once
instantiated and initialized, are added directly to the osg::StateSet where
our program will run.
The next example illustrates how to use shaders with OSG. It uses a simple program that contains a single fragment shader, which simply paints all fragments with a color passed in an uniform variable. Again, the scene graph for this example (Figure 3.3) is boring, because, once more, we are simply playing with the state of the displayed model.
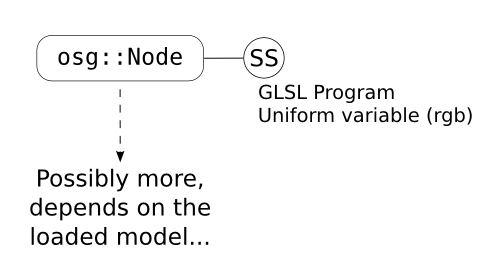
Figure 3.3: The still boring scene graph for the Shader Viewer.
// ShaderViewer.cpp

#include <iostream>
#include <osg/Program>
#include <osg/Shader>
#include <osgDB/ReadFile>
#include <osgViewer/Viewer>

const std::string TheShaderSource =
   "uniform vec3 rgb;\n"
   "void main()\n"
   "{\n"
   "   gl_FragColor = vec4(rgb, 1.0);\n"
   "}\n";

int main(int argc, char* argv[])
{
   // Check command-line parameters
   if (argc != 2)
   {
      std::cerr << "Usage: " << argv[0] << " <model file>\n";
      exit(1);
   }

   // Load the model
   osg::ref_ptr<osg::Node> loadedModel = osgDB::readNodeFile(argv[1]);

   if (!loadedModel)
   {
      std::cerr << "Problem opening '" << argv[1] << "'\n";
      exit(1);
   }

   // Do the shader stuff
   osg::ref_ptr<osg::Shader> shader(            // (1)
       new osg::Shader(osg::Shader::FRAGMENT)); // (1)
   shader->setShaderSource(TheShaderSource);    // (1)

   osg::ref_ptr<osg::Program> program(new osg::Program()); // (2)
   program->addShader(shader);                             // (2)

   osg::ref_ptr<osg::StateSet> ss = loadedModel->getOrCreateStateSet();
   ss->setAttribute(program);

   osg::ref_ptr<osg::Uniform> rgbUniform(                 // (3)
      new osg::Uniform("rgb", osg::Vec3(0.2, 0.2, 1.0))); // (3)
   ss->addUniform(rgbUniform);                            // (3)

   // Create a viewer, use it to view the model
   osgViewer::Viewer viewer;
   viewer.setSceneData(loadedModel);

   // Enter rendering loop
   viewer.run();
}
On the lines marked with (1) we instantiate the shader and set its source code.
In this case, we created a fragment shader (osg::Shader::FRAGMENT; OSG also
supports osg::Shader::GL_VERTEX_SHADER and
osg::Shader::GL_GEOMETRY_SHADER_EXT), and set its source code directly from a
string (setShaderSource(); there is also a handy loadShaderSourceFromFile()
method).
Then, in (2), we create the program and add our shader to it. As when using GLSL
without OSG, multiple shaders can be added to the same program. The program is
added to the state set just like any other osg::StateAtrribute. The lines
marked with (3) show how to create a uniform variable and add it to an
osg::StateSet (thus, making the uniform available for the shader).
And this is pretty much everything OSG-specific there is to know about shaders.
I could mention that OSG automatically defines some handy uniform variables
(like osg_FrameNumber, osg_FrameTime, osg_DeltaFrameTime, osg_ViewMatrix
and osg_ViewMatrixInverse), but that would be stretching a beginner’s guide
too much.
-
The number of supported lights varies from implementation to implementation, but at least eight are guaranteed to be there; if you ever need the actual number, you can call
glGetInteger()passingGL_MAX_LIGHTSas parameter. ↩︎